Manchester United 1-1 Tottenham Hotspur
PREMIER LEAGUE | GW6 | 10.10.2026
Overview
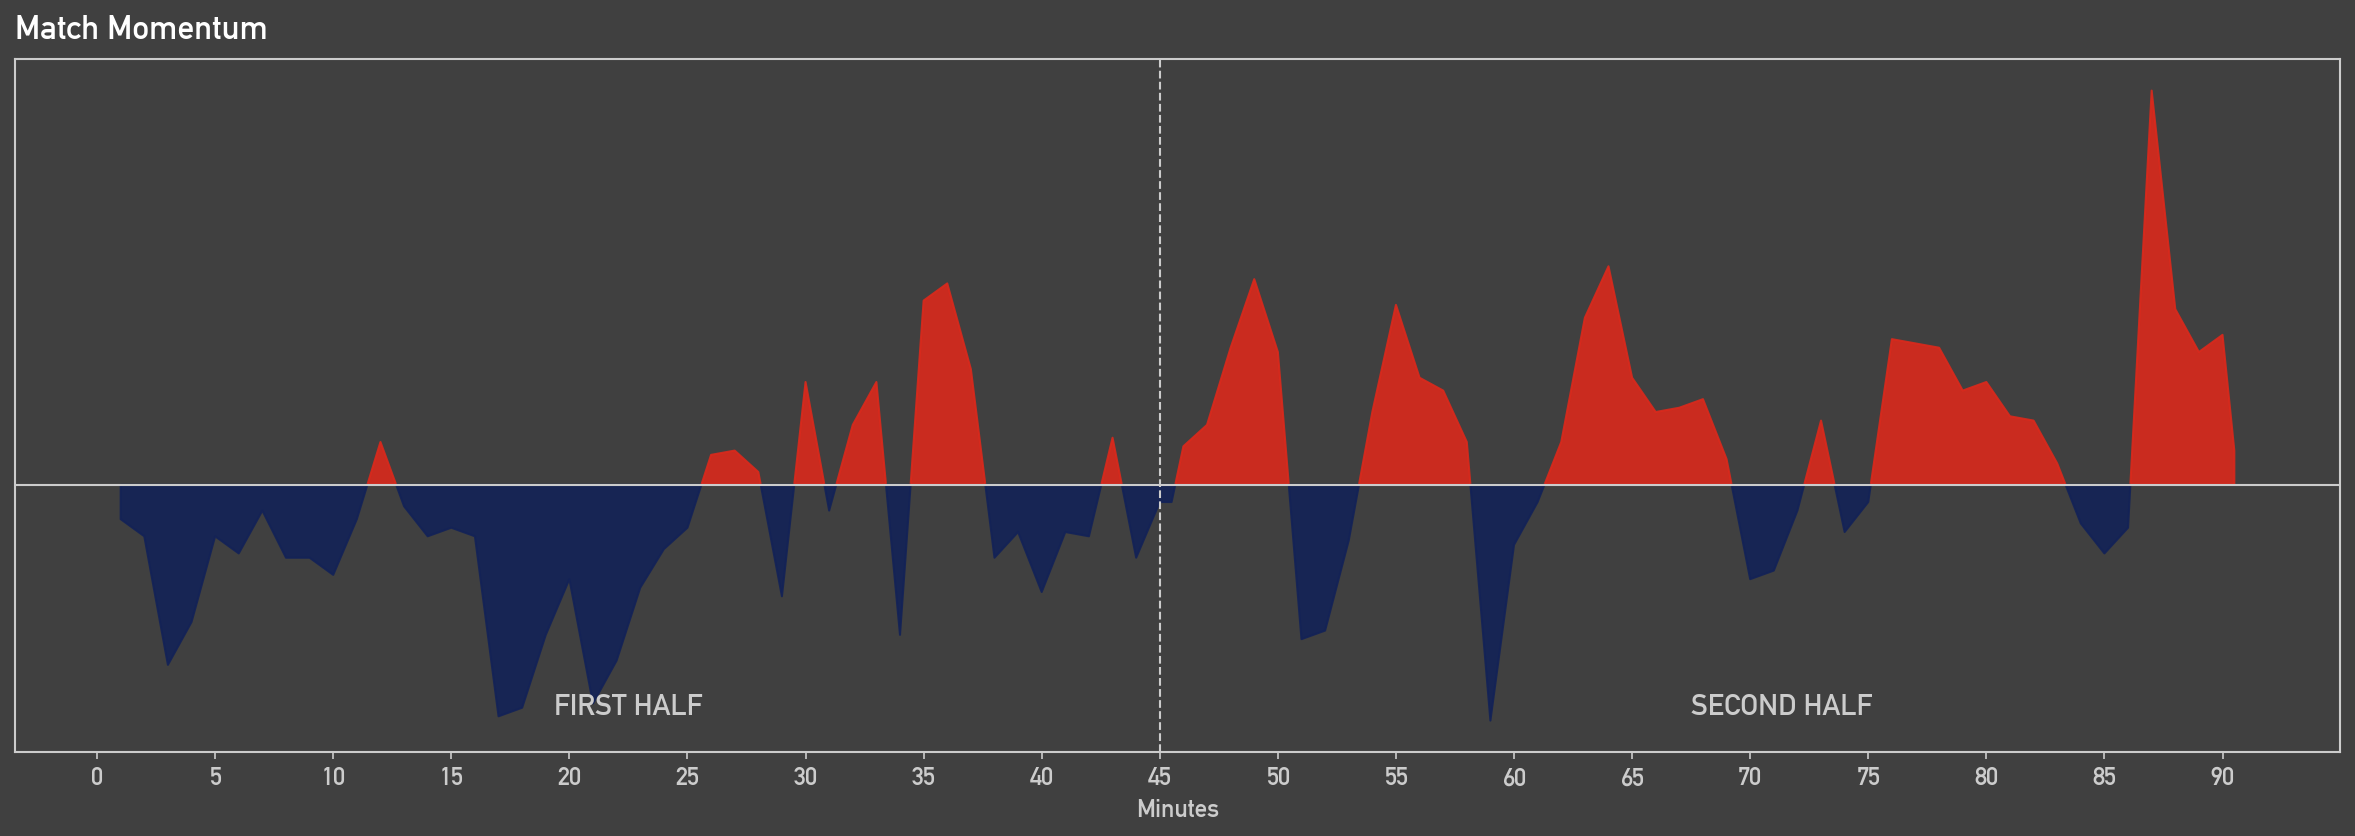
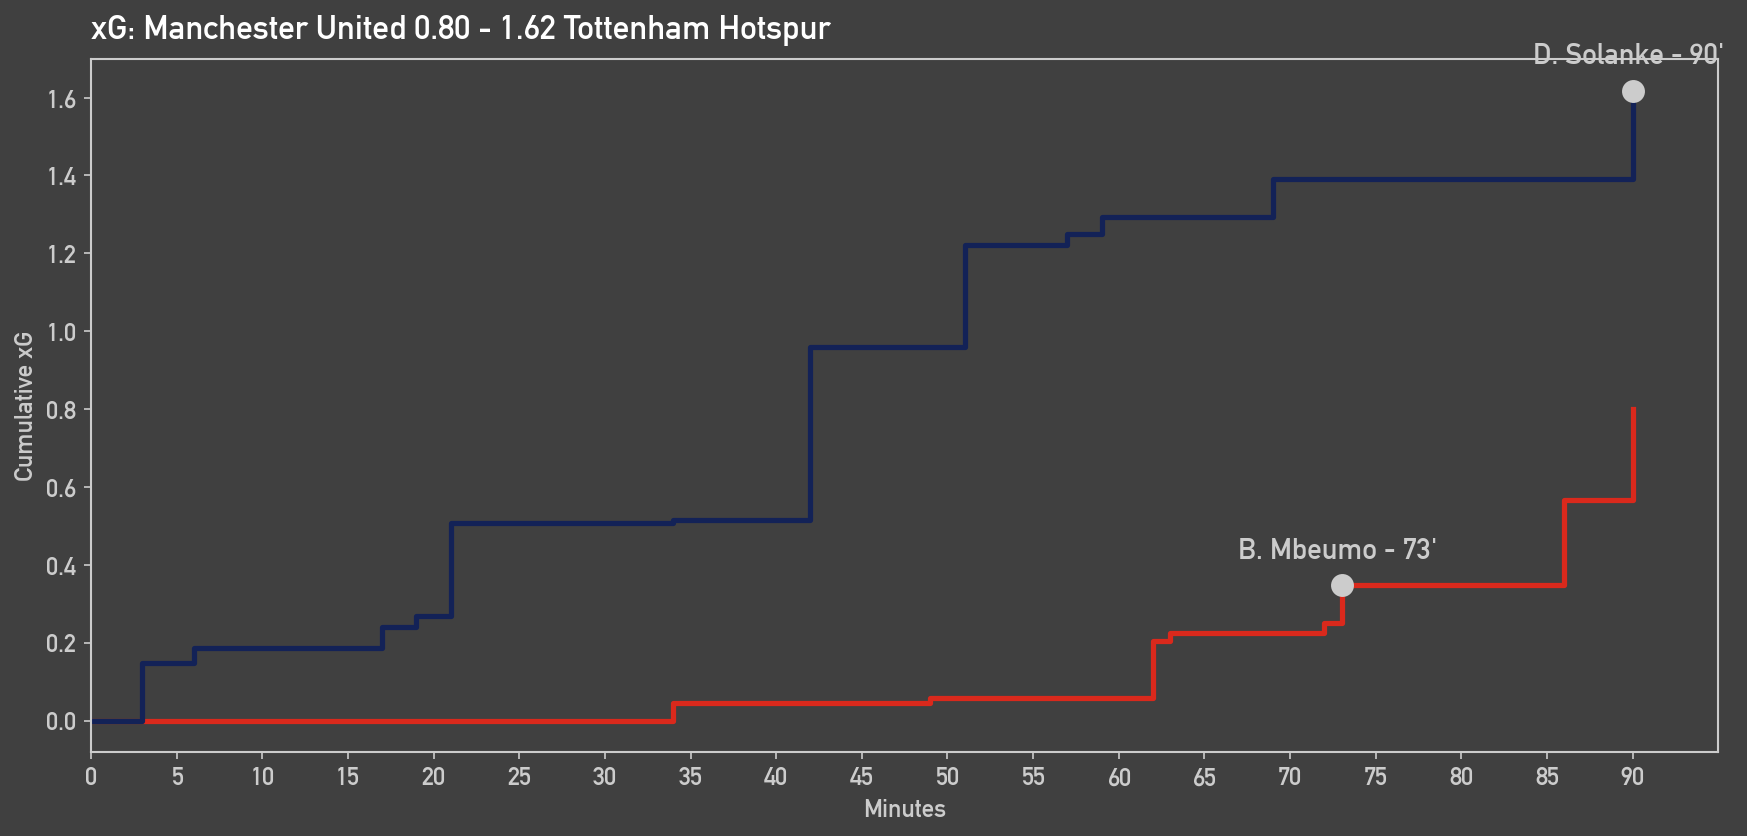
It was a familiar story at Old Trafford this weekend as Spurs made a bright start but once again struggled to turn their dominance into goals. Much of their success stemmed from their control of midfield, where Manchester United struggled to cope with Spurs' intensity and rotations. However, wasteful finishing left Spurs trailing against the run of play, with frustrations boiling over when Bentancur was sent off in the 78th minute. Despite playing the remainder of the match with ten men, Spurs showed considerable character to fight their way back into the game, as Dominic Solanke's late equaliser secured an important point.
The Midfield Battle
The midfield battle was a decisive factor in the game, with Spurs dominating for long periods thanks in large part to Manchester United's disorganised defensive structure.
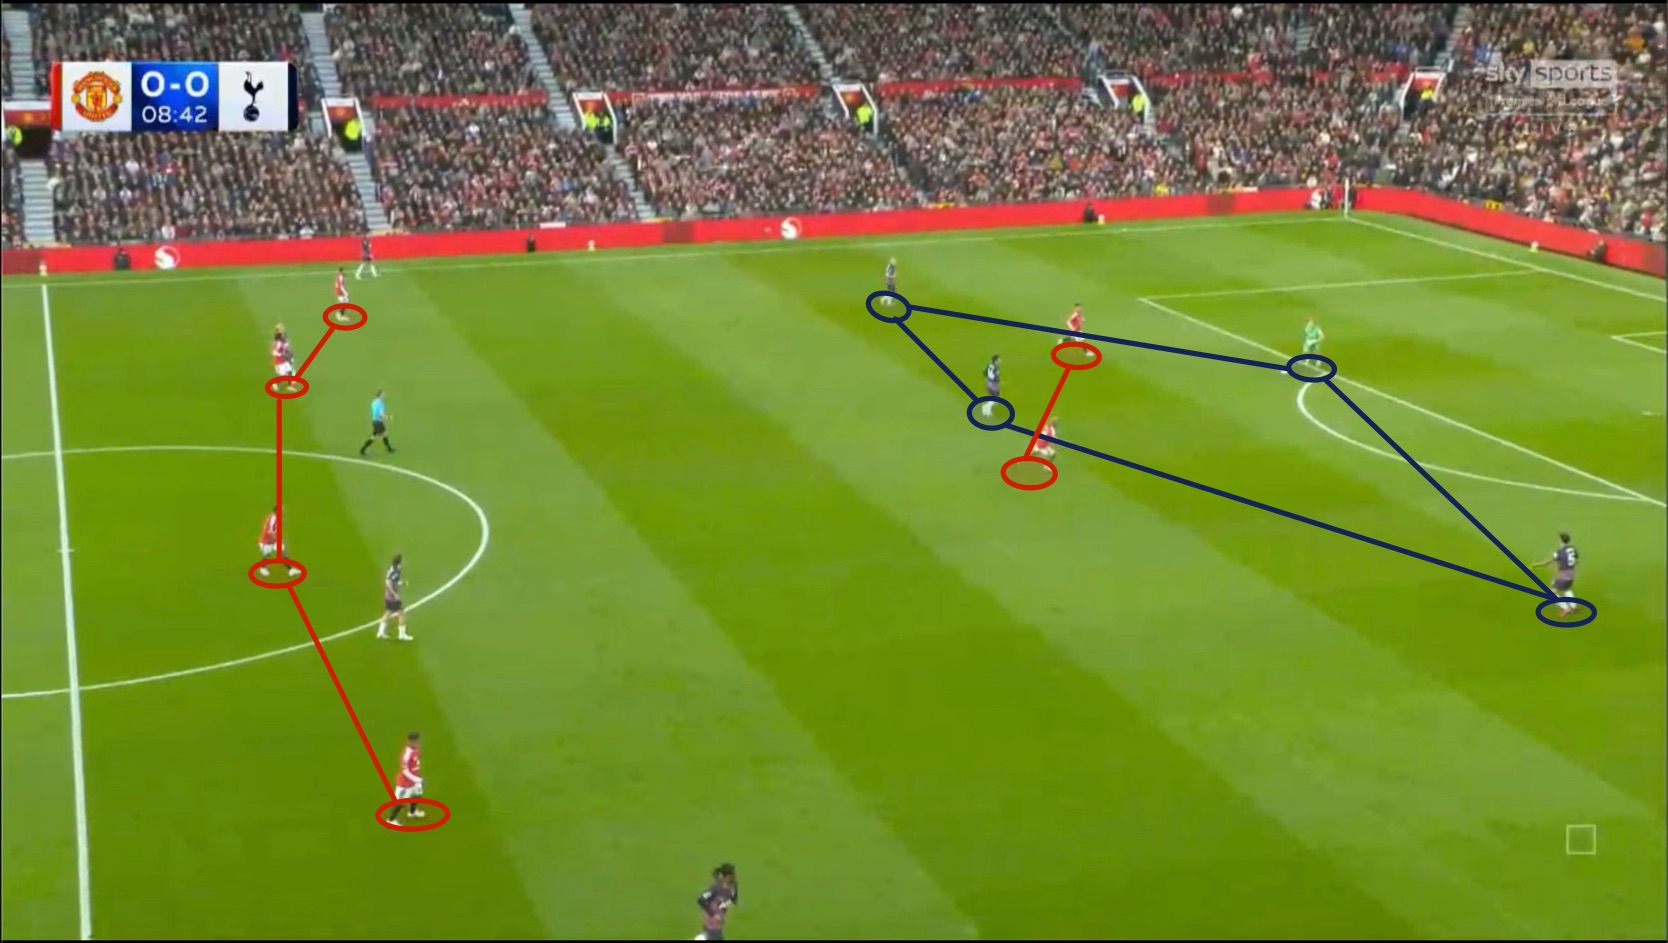
Image 1: Tonali drops deep to create a 4v2 overlaod against Manchester Untied's first line.
Early on, United looked to press high in a 4-4-2 shape, with Fernandes joining Mbeumo in the first line. However, Tonali's deep positioning undermined this approach by creating a 4v2 overload in Spurs' favour, allowing them to play through the press with relative ease. Figure 1 also highlights the significant gap between United's first and second lines, further weakening their pressing structure and giving Spurs more time and space on the ball.
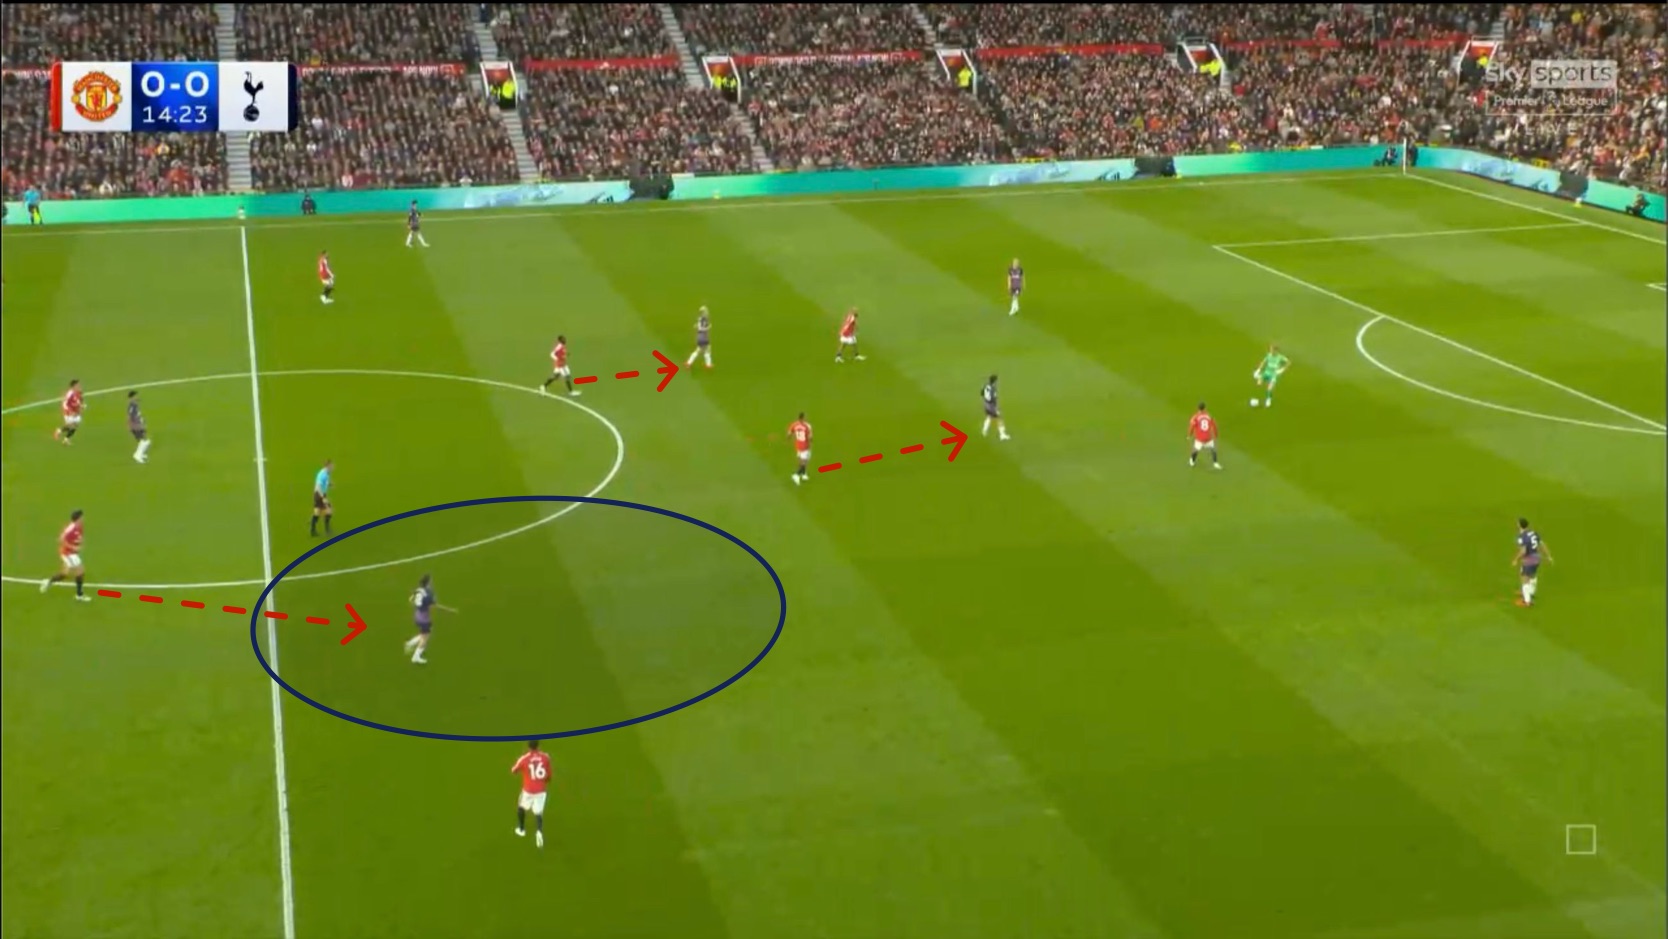
Image 2: Spurs's midfield occupy different lines, causing problems for the United players and leaving space for Gallagher.
United subsequently attempted to disrupt Spurs' build-up by pressing more aggressively, but Spurs' use of different midfield lines created further problems. In Figure 2, Tielemans follows Tonali higher up the pitch in an attempt to deny him access to the ball. In doing so, however, he leaves Gallagher with significant space in the left half-space. With Mainoo following Bergvall as he also drops deeper, Maguire is forced out of the defensive line to engage Gallagher. This leaves United's back line in a 3v3 situation with Spurs' front three, which Senesi attempted to expliot with a direct ball.
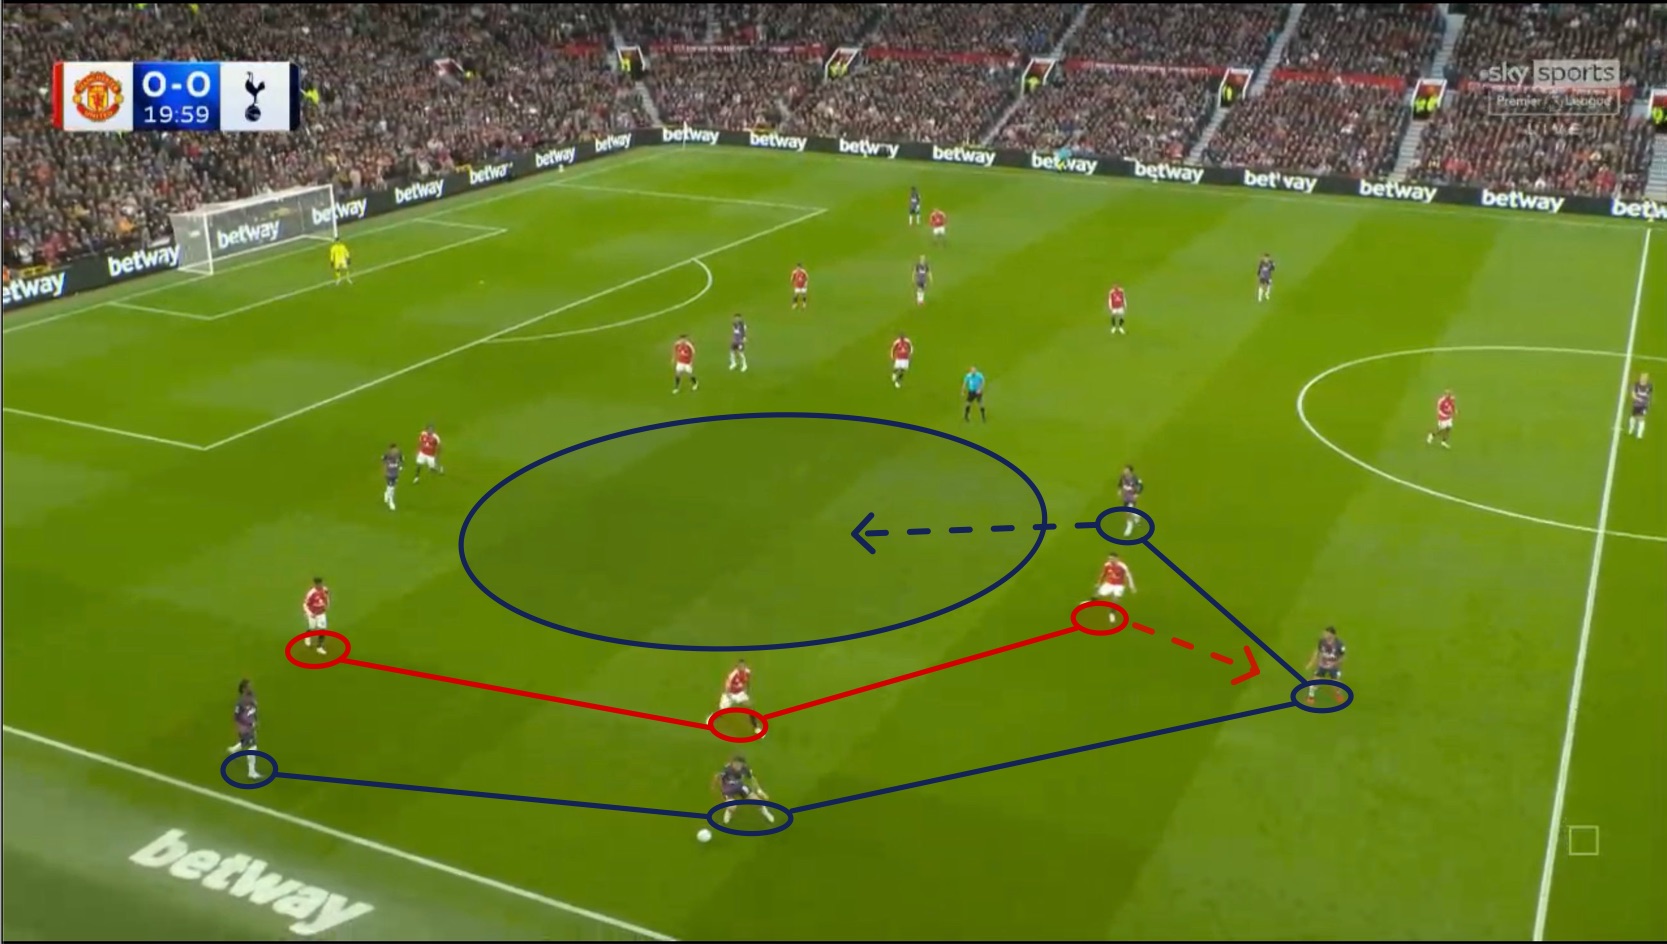
Image 3: Spurs' rotations create a 4v3 on the left flank and Bruno's poor awarness leaves space for Tonali to exploit.
Figure 3 illustrates another of Spurs' recurring patterns: wide rotations designed to create a 4v3 overload. Udogie pushes forward while Gallagher drops into the left-back position, drawing Tielemans out of position and opening a large gap in midfield. Bruno's lack of awareness of the space behind him allows Spurs to exploit this disorganisation. When the ball is recycled to Sensi, Bruno presses forward, leaving Tonali with space to drive into upon receiving the ball. The sequence leads to another excellent chance for Kudus, worth 0.24 xG, but Spurs once again fail to punish United's disorganised defensive structure.
High Turnovers
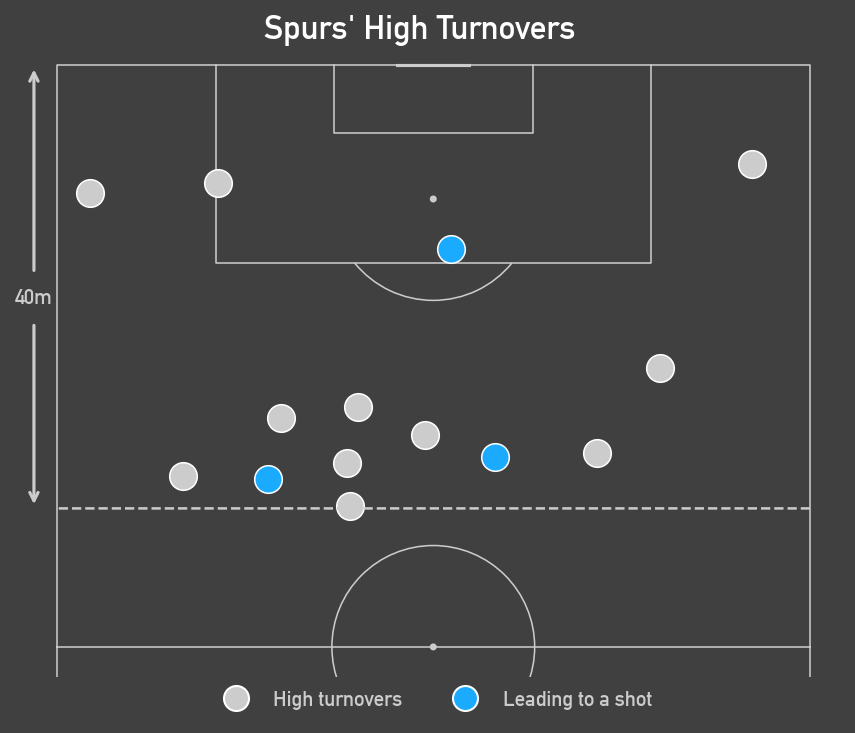
Figure 1: Spurs' high turnovers against Manchester United.
Another consequence of Spurs' dominance in midfield was their ability to force high turnovers. A high turnover is defined as a regain of possession within 40 metres of the opposition goal. Figure 1 shows that Spurs recorded 14 high turnovers against Manchester United, highlighting their ability to disrupt United's possession in dangerous areas.
One possible explanation lies in United's disorganised structure out of possession which left players out of position to retain possession after winning it back. This often allowed Spurs to effectively counter-press and to win second balls, forcing turnovers high up the pitch.
However, Spurs struggled to capitalise on these opportunities, with only three of their 14 high turnovers leading to a shot (21.4%). Those shots carried an average xG of 0.17, compared with 0.12 for shots arising from other situations, suggesting that these regains did create opportunities of relatively high quality. Nevertheless, Spurs failed to convert any of the three attempts. Their inability to generate shots from the majority of these turnovers, often the consequence of poor decision-making or inaccurate final passes, further highlights the inability to capitalise upon their dominance in games.
United's Substitutions
Although Spurs dominated much of the first hour, Carrick's substitutions in the 59th minute helped swing the momentum back in Manchester United's favour. By this stage, Tielemans and Mainoo were struggling to cope with the intensity and movement of Spurs' midfield, with players such as Savio breezing past them in transition.
Carlos Baleba replaced Tielemans, making his first appearance in a Manchester United shirt, and helped restore some defensive stability to the midfield. However, the more influential change was the introduction of Zirkzee, whose movement created significant problems for Spurs and helped United regain control of the game.
Prior to Zirkzee's introduction, Spurs had largely succeeded in nullifying United's creative players, particularly Fernandes, who was closely tracked by Tonali. Meanwhile, Bergvall and Gallagher pressed United's two deeper midfielders, effectively restricting their ability to progress the ball into dangerous areas during the opening hour.
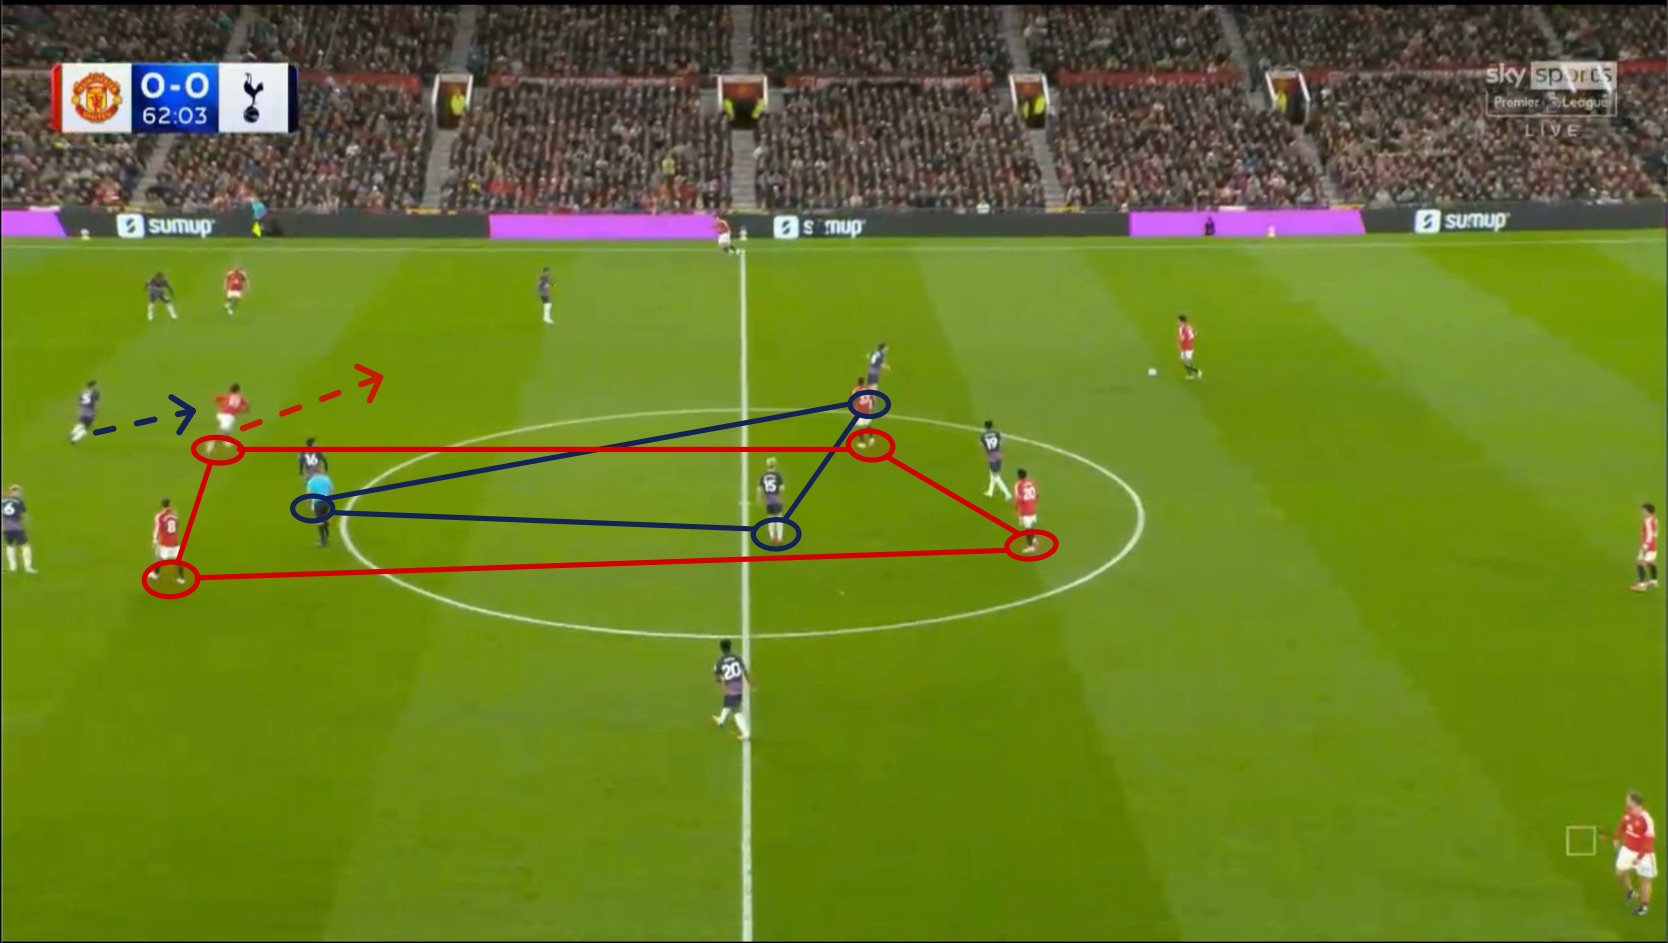
Image 4: Joshua Zirkzee dropping into midfield to create a 4v3 overload in Manchester United's favour.
Zirkzee's introduction changed this dynamic. As shown in Figure 4, his tendency to drop into midfield created a 4v3 overload in United's favour, giving them an additional passing option between the lines. This movement also presented Spurs' centre-backs with a dilemma: follow Zirkzee into midfield and risk opening spaces in the defensive line, or hold their positions and allow him to receive the ball unopposed. United exploited the resulting spaces through quick combinations in wide areas, establishing a sustained period of pressure that ultimately led to the opening goal.
Final Thoughts
Overall, this was a difficult performance to make sense of. Spurs dominated large periods of the game, regularly playing through Manchester United with relative ease, an encouragin sign for De Zerbi. Yet, despite their control of the game, Spurs once again struggled to convert their chances. Their average of 0.13 xG per shot was their highest so far this season, suggesting that they were creating opportunities of genuine quality. The frustrating aspect, however, is that you can't directly coach players to finish the chances they create.
I do also see some mentaility issuess within this team. When a team repeatedly fails to capitalise on its dominance, frustration can begin to creep in, particularly when the opposition scores against the run of play. In a game where Spurs could arguably have established a comfortable lead, finding themselves 1–0 down may have intensified that frustration, contributing to the loss of composure that culminated in Bentancur's dismissal.
Nevertheless, Spurs showed considerable character to fight back after going down to ten men, with Solanke's late equaliser securing a deserved point. That resilience, combined with the quality of their build-up play and their ability to create chances, provides genuine reasons for optimism. If Spurs can become more clinical in front of goal while continuing to build on De Zerbi's tactics, there is plenty of reason to believe this team can achieve something this season.